11 Chain Graph: The "Launch Protocol"
📍 Demo Info
-
Scene Preview
-
Scene Path
Assets/TinyGiants/GameEventSystem/Demo/11_ChainEvent/11_ChainEvent.unityGoalTo demonstrate the Chain Node (Sequence) logic. Unlike Triggers which fire in parallel, Chains execute strictly one by one. If any node fails or delays, the entire pipeline pauses or breaks.
📝 Description
The "Protocol" Architecture In gameplay systems (like a Weapon Launch or a Cutscene), order matters. You cannot "Fire" before you "Charge". You cannot "Cooldown" before you "Fire".
The 5-Step Launch Sequence:
We raise ONE root event (0_StartSequence). The Graph then orchestrates this pipeline:
- System Check: Verifies if the Safety Lock is OFF. (If failed, the chain BREAKS).
- Charge: Plays a charging effect. (Pauses for 1.0s).
- Fire: Launches the projectile.
- Cool Down: Vents steam. (Waits for visual completion).
- Archive: Logs the action. (Argument Passing Blocked).
🛠️ Scene Setup
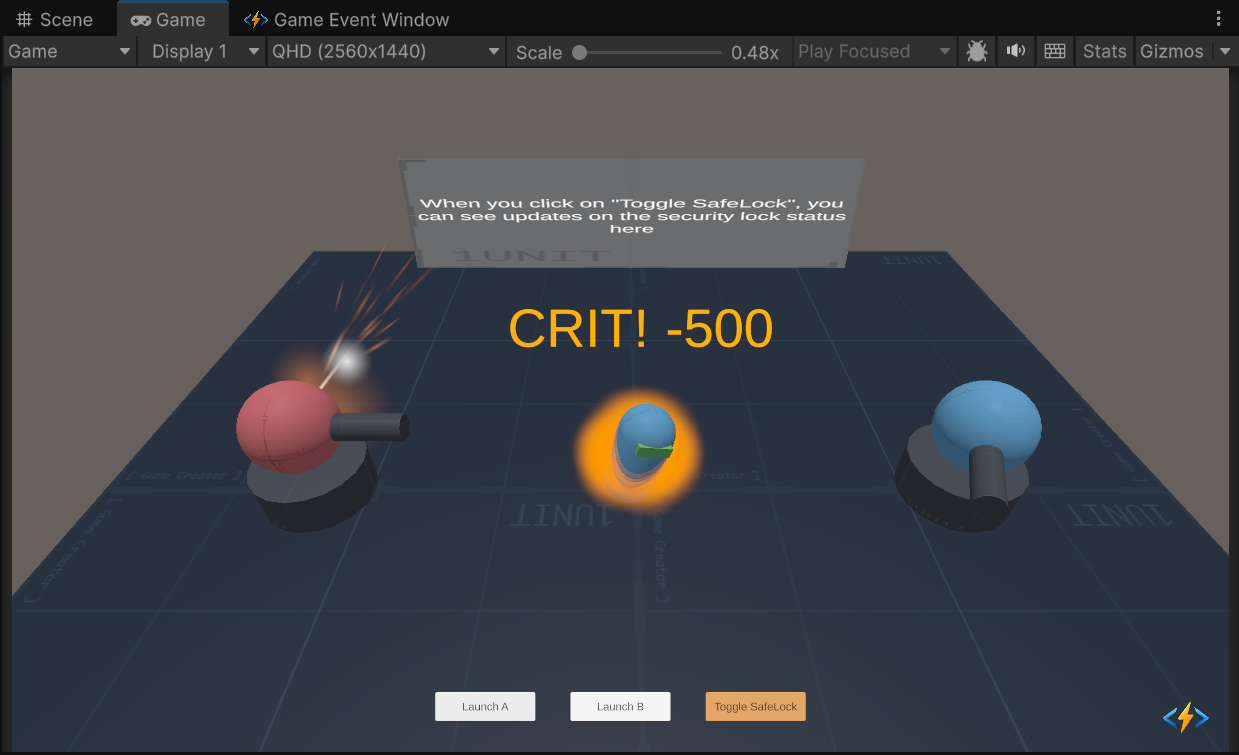
- Turret A & B: Two launchers ready to fire.
- Toggle SafeLock Button:
- OFF: The check passes. Launch proceeds.
- ON: The check fails. Launch aborts at Step 1.
- Holo Screen: Displays the current lock status.
🎮 How to Test
- Enter Play Mode.
- Phase 1: Successful Launch
- Ensure SafeLock is OFF (Holo text says "READY").
- Click "Launch A".
- Observe: The sequence plays out step-by-step.
- Check (Instant) -> Charge (1s) -> Fire -> Cooldown (Steam) -> Archive.
- Phase 2: Blocked Launch
- Click "Toggle SafeLock". Screen turns Red ("LOCKED").
- Click "Launch B".
- Observe: The screen flashes Red (Alarm). NO Charge, NO Fire.
- Reason: The Chain broke at Node 1 because the Condition failed.
🔑 Key Configuration
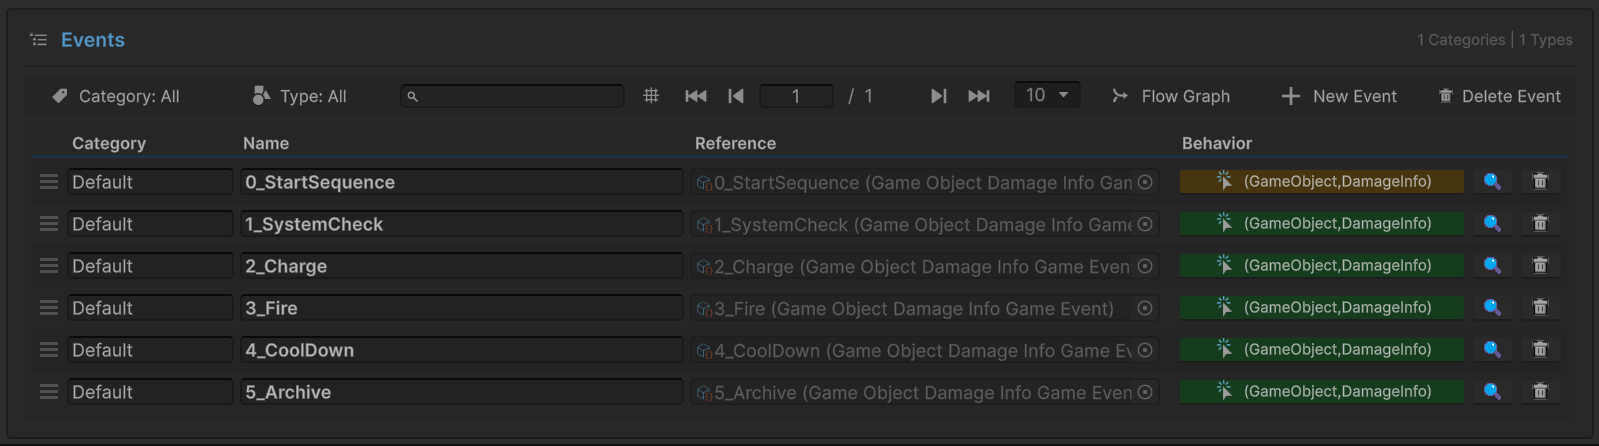
1. Event Definition (Editor)
Before building the graph, we defined distinct events for each stage of the pipeline.
0_StartSequence: The Trigger.1_SystemCheck,2_Charge, etc.: The Steps.
This separation allows us to bind specific logic (like Audio or VFX) to "Charge" separate from "Fire".
2. The Flow Graph (The Pipeline)
Open the Flow Graph Window to see how these events are wired into a linear structure.

Node 1: System Check (The Gate)
- Type: Chain Node (Green).
- Condition:
Scene.Receiver.IsSafetyCheckPassed == True. - If this fails, the execution pointer stops here.
Node 2: Charge (The Pacing)
- Delay:
1.0s. - The graph pauses here for 1 second before moving to Node 3.
Node 3: Fire (The Action)
- Logic: Standard execution.
Node 4: Cool Down (The Async Wait)
- Wait For Completion: Checked.
- The graph waits for the steam particle effect (managed by Coroutine in Receiver) to finish before moving to Node 5.
Node 5: Archive (The Firewall)
- Pass Argument: Unchecked.
- The final log message receives empty data, proving we can sanitize data streams at the end of a chain.
3. Raiser Assignment (Inspector)
Select the ChainEventRaiser object.
It only holds a reference to the Entry Point (0_StartSequence). It knows nothing about the complex steps that follow.

💻 Code Walkthrough
1. The Sender (ChainEventRaiser.cs)
Just like the Trigger demo, the sender is simple. It just says "Start".
public class ChainEventRaiser : MonoBehaviour
{
    [GameEventDropdown]
    public GameEvent<GameObject, DamageInfo> sequenceStartEvent;

    public void RequestLaunchA()
    {
        _isBusyA = true; // Visuals only

        // Start the Chain
        // The graph will take over from here.
        sequenceStartEvent.Raise(turretA, info);
    }
}
2. The Receiver (ChainEventReceiver.cs)
The receiver has separate methods for each step of the chain.
public class ChainEventReceiver : MonoBehaviour
{
    // Step 1: Condition Check
    // Used by the Graph Condition Node.
    public bool IsSafetyCheckPassed
    {
        get
        {
            if (!isSafetyLockDisengaged)
            {
                // Visual feedback for failure
                StartCoroutine(ScreenRoutine());
                return false;
            }
            return true;
        }
    }

    // Step 2: Charge
    public void OnStartCharging(GameObject sender, DamageInfo args) { ... }

    // Step 3: Fire
    public void OnFireWeapon(GameObject sender, DamageInfo args) { ... }

    // Step 4: Cool Down
    public void OnCoolDown(GameObject sender, DamageInfo args) { ... }

    // Step 5: Archive (Received data is null because PassArg=False)
    public void OnSequenceArchived(GameObject sender, DamageInfo args)
    {
        bool isClean = (args == null || args.amount == 0);
        Debug.Log($"Archived. Data Status: {(isClean ? "CLEAN" : "LEAKED")}");

        // Unlock the turret for next use
        chainEventRaiser.UnlockTurretA();
    }
}
Using a Chain Graph is cleaner than writing a giant Coroutine with yield return new WaitForSeconds() scattered everywhere. It makes the timing visible and editable by designers.